Making trousers
Contents
We're going to take our inspiration from one of the hypotheses put forward for the Skjoldehamn braids (10th-11th century Norway). Here too, the pattern is very simple. This type of braie allows good ease of movement and is tightened at the waist by a cord. However, it's best not to use a fabric that's too thick, as this could create an unsightly 'layer' effect. Nevertheless, everything is hidden by the tunic.
Preambles
To get started and find out more about choosing fabrics, colours and stitches, go to our Basic sewing tutorial.
1/ Pattern making
These braies require 3 pieces of fabric. Add 2 cm to each length to allow for seams and hems.
Legs:
These are trapezoids
- The short side must allow the foot to pass through. It should therefore be slightly larger than measurement 10. Add at least 4 cm.
- The large side depends on the width at knee level. The right size can be found by the following calculation:
- The height depends on the inseam length (measurement 3) plus 40 cm. The total must be greater than measurement 2.

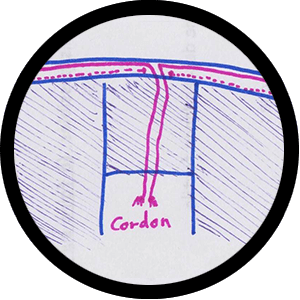
The crotch :
It's a rectangle.

2/ Sewing
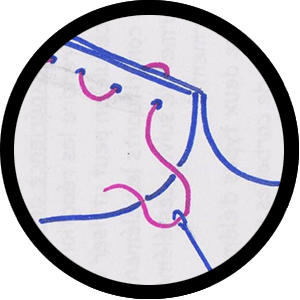
1. Sew the trouser legs together right sides together, right down to the crotch.

2. Sew each leg to the crotch. To do this, sew right sides together the rectangular piece to the two segments [AB] left uncut on the legs.

3. Fold the top of the trousers into a pleat about 3 cm high, trapping a strong cord. Sew this pleat, leaving a small opening at the front of the braids.

4. Sew the hem to the bottom of the trousers.

Examples

Wool braids. The model above is fitted with slippers.